開発ツールのインストール
Visual Studio Code
Visual Studio Code をインストールしていない場合は、以下のサイトからダウンロードしてインストールする。 https://code.visualstudio.com/
Anaconda
Pythonをインストールしていない場合は、以下のサイトから Anaconda もしくは Miniconda をダウンロードしてインストールする。(本記事の中では Python 3.6 の Anaconda をインストール) https://www.anaconda.com/download/ https://conda.io/miniconda.html
Visual Studio Code の環境設定
Visual Studio Codeを実行
以下のコマンドでフォルダを作成した後にVisual Studio Codeを起動する。
mkdir hellocd hellocode .

python 拡張機能のインストール
Control + Shift + x もしくは、左の「拡張機能」のアイコンをクリックして、python の拡張機能をインストールする。python の拡張機能は、pythonで検索すると出てくるので、以下の Microsoft が管理するものを使用する。

python 環境の選択
Control + Shift + p でコマンドパレットに "python select interpreter"を入力して、python の環境を選択する。


conda create -n py35 python=3.5
なお、Anaconda Promptでにより以下のコマンドを使用すると作成されたPython環境を一覧表示することができる。
conda info -e
Anaconda PromptでPython環境を選択する場合は、activateを使う。
activate py35

構文チェックのために pylint をインストール
Visual Studio Code の python 拡張機能では、標準で pylint を使用しているため、"py35"環境で pylint をインストールする。
activate py35conda install pylint
念のため、Visual Studio Code の Reload Window(Control + Shift + p で Reload Window)を実行して、動作を確認してみる。プログラムを書いてセーブしたときにチェックされる。

単体テストのために pytest をインストール
Visual Studio Code の python 拡張機能では、unittest と pytest と Nose を使うことができる。既定の設定では全て無効になっているため、既定の設定をワークスペースの設定で書き換える。ユーザ設定(Control + Shift + p で Open User Settings)を開いてワークスペースの設定タブを選択後、"python.unitTest.pyTestEnabled"をtrueににした設定を追加する。(既にほかの設定が入っている場合、上の行の","を忘れないように)
{"python.pythonPath": "C:\\Users\\kenta\\AppData\\Local\\conda\\conda\\envs\\py35\\python.exe","python.unitTest.pyTestEnabled": true}
https://docs.pytest.org/en/latest/

"py35"環境にpytestをインストールする。
activate py35conda install pytest
pytest.iniを作成する
pytestの設定を行うため、helloフォルダにpytest.iniを作成する。test_から始まるファイルや、クラス名がTestから始まるもの、関数がtest_で始まるものをpytestで実行する。
[pytest]testpaths = .python_files = test_*.pypython_classes = Testpython_functions = test_
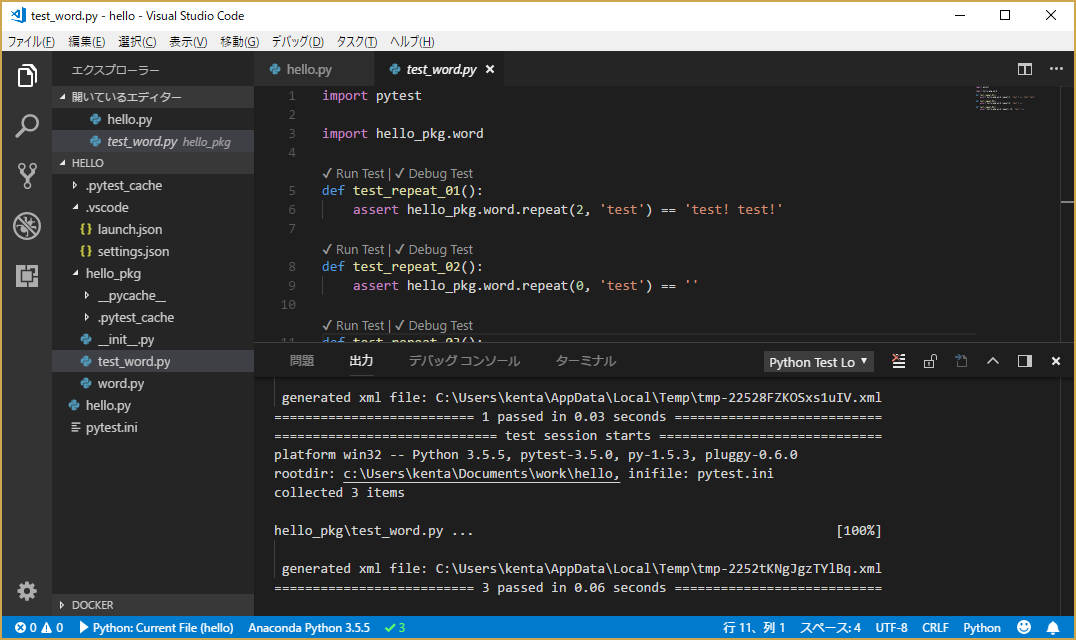
単体テスト実行
テストコードを書いたら、Control + Shift + p でRun All Unit Testsを実行して単体テストコードを実行することができる。なお、テストコードを自動で見つけるため、エディタ内のRun Testをクリックすることにより、テストを行うことができるようになる。
def repeat(count = 2, word = 'hello'):"""repeat the word specified times.Keyword Arguments:count {int} -- specified times (default: {2})word {str} -- repeat word (default: {'hello'})Returns:str -- repeated words"""words = []for i in range(count):words.append(word + '!')return ' '.join(words)def main():hello = repeat(3, 'hello')print(hello)if __name__ == '__main__':main()
import pytestimport worddef test_repeat_01():assert word.repeat(2, 'test') == 'test! test!'def test_repeat_02():assert word.repeat(0, 'test') == ''def test_repeat_03():assert word.repeat(-10, 'test') == ''
docstringの拡張機能をインストール
Control + Shift + x もしくは、左の「拡張機能」のアイコンをクリックして、autoDocstring の拡張機能をインストールする。関数定義の下段で"""を記入後にエンターを押すと、引数と戻り値から自動的に docstring を書いてくれる。

さいごに
まだ色々できるので、時間があるときにメモを増やしていきたいですー。